Tuesday, December 14, 2010

Easy Starfish Ornaments


I am helping in my 3rd grade son's class tomorrow with the children's holiday craft.  I really wanted the children to make something easy and stay on a tight budget.  On a recent walk around Balboa Island (in Newport Beach, CA) with my friend Gail, we saw this adorable wooden tree with seashell and starfish ornaments inside a local store called Hersey's Market.  The starfish were very simple; bleached white stars with glitter and a plain white piece of yarn glued to the back for hanging.  The idea was so simple and so elegant at the same time.  I ran the idea by another mom from our class and my son's teacher and we agreed this would compliment the other crafts nicely.  My version for the class varies just slightly from the one I saw on my walk.  Here's what we are using:

* White Starfish ~ purchased in bulk on ebay to save money. I believe I searched under "lot white starfish" I was able to buy 25 for $16.00  I decided to buy 2 sets because these starfish measure 2" which is nice but not that big.  I also thought that if any of the children needed a gift for mom's house and another for dad's or for grandma, etc. that having an extra one to share would be nice.
* I found a wonderful spool of Christmas ribbon at a local wholesale store called Shinoda.  The ribbon is gold, red and green.  My son went with me and he said "mommy this is perfect!"  Its a huge spool that I got for about $4.00.  Tonight I discovered the really great thing about this ribbon: its wired! It makes bending it so easy!
*Sparkle Modge Podge available at Michael's Arts & Crafts and other places I am sure, but strangely, not at our local Joann's Fabrics.  Modge Podge also makes Glitter Modge Podge in Silver and Gold but I opted for Sparkle because I've used it before and I just love the way it looks! The large jar was around $6.00 and will be enough for the entire class plus I'll have left overs.
* Sponge brushes for appying the modge podge
* Hot glue gun & glue sticks for adding the ribbon. This requires just a small amount of glue on the back and dries immediately.
*This step is optional but I used a small piece of recycled foil to let my starfish dry on so it didn't stick to a paper surface.  I didn't want to risk breaking one of the delicate legs off the starfish trying to peel it off paper.

The only step that takes a few minutes is letting the modge podge dry.  Other than that, this is an extremely quick and easy craft. I cut all of the ribbon pieces ahead of time tonight so tomorrow it will be very easy to attach them.  I recommend attaching the ribbon after the modge podge dries so the ribbon remains nice and clean.  I'm sure this goes without saying, but I will be operating the glue gun for the children.  Have you ever burned yourself on a high temperature glue gun?  The worst for me was a burn on my thumb that lasted a month last year when I was making a Christmas Seashell Tree for my mom and dad. Ouch is all I can really add! So rest assured, the children will not be operating the hot glue gun ;)

If you try this craft, I'd love to hear your feedback and post any pictures you have to share. Another thought is that these would look adorable as an embellishment to a gift bag or tied onto a package.  My friend Gail gave me a birthday present recently and she took a plain white claim shell, wrote on it with black pen and drilled a small hole into it and hung rafia ribbon through it and hung it off the handle of my gift bag.  It was unique and very cleaver and pretty!  Here's a picture of how my sample starfish looks on our Christmas tree. Enjoy!


Wednesday, November 24, 2010

Thankful For You Sale!

We are having a big sale as a thank you to all of you for making our holiday season so wonderful!

Pink Candylights 7-Watt Pink Bulbs

The Queen one of a Kind Jeweled Bits & Pieces Altered Art Collage

                                                                              Madonna With Child Altered Art One of a Kind Collage

Paris Pillows Hand Printed

Paris Pillows Hand Printed
 
Paris Pillows Hand Printed


One of a Kind Jeweled Seashell Urn

One of a Kind Pink Wine Stops made from vintage door knobs

Pink Glassware Sugar/Cheese Shaker and Syrup Pitcher. Solid, heavy glass made in the USA.

Saturday, November 6, 2010

Pink Present Giveaway

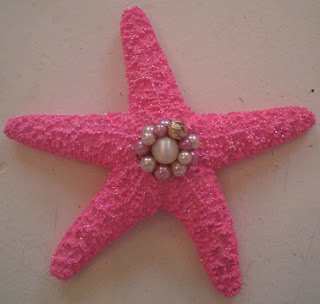
Shabby Cottage Shops is having a Pink Present Giveaway! I have donated a one of a kind, hand painted pink starfish, lightly dusted with utra fine glitter and topped with a vintage earring. Be sure to enter to win!


Friday, October 15, 2010

Pinkalicious Christmas


Please visit all chic boutiques and discover the treasures you'll

find for this year's Holiday gift giving season at

Shabby Cottage Shops, its where the finest boutiques gather!


Wednesday, September 15, 2010

Team Bella Lucille walks for the American Lung Association

My 4 children and I are walking on October 2, 2010 to raise money and awareness for the American Lung Association. We will be driving more than an hour from our home to participate in this walk.  One of my sons has asthma so this is a cause very close to our hearts. From now until Oct 1, 2010, anyone who makes a donation to team Bella Lucille of $10 or more will receive 15% off your next Bella Lucille order, please email me for the sale link after making your donation. Thank you for your consideration!  The link to our team page is here: http://bit.ly/bbZY6r


Update:  We surpassed our fundraising goal and we are thrilled! A HUGE thank you to those of you who donated so generously to our team! Some of our donors are: Shabby Cottage Shops, The Nurani Family, The Fuller Family, The Fairborn Family, The Balalis Family, DustyOak Ornaments, and several anonymous donors too.  We had a great time and the weather was perfect! Above is our team picture before the walk.

Sunday, July 11, 2010

12 Days of Giveaways and Christmas in July


12 Days of Giveaways and Christmas in July starts on Tuesday, July 13, that's just two days away! We'll be starting this shopping extravaganza off with our 1st daily giveaway from one of our shops! Make sure to stop by and enter for a chance to win one of our giveaways, there will be 12 of them, some will have more than one giveaway from the featured boutique or boutiques for each day! We will be posting a list along with pictures of each item and the featured boutique or boutiques and Giveaway of the day, on Tuesday July 13! There is no purchase necessary to participate and the giveaways are fabulous! The daily winner will be announced here on the blog, just look at the category "lucky winners" to see if you were chosen. We will also announce it on facebook, twitter and at Shabby Cottage Shops everyday, so be sure to check back and see if you are one of the lucky winners!

Friday, February 12, 2010

Pink Valentines With Victorian Ephemera Scrap


I made a few of these as gifts for friends, and then brought in the supplies today to help 32 6th graders make their Valentines. I have 2 pictures below.  These are so pretty and easy to make.

You need:

An 8" wooden heart, available at Michael's and Woodworks Ltd. www.craftparts.com They are less expensive at $.99 each at Woodworks, compared to Michael's at $1.29 each. Not a big deal but I bought enough for the class so the savings was nice with Woodworks Ltd.

Plain Modge Podge
Glitter Modge Podge
Sponge brushes
Victorian Scrap printed on card stock and cut out
Paint
Drill
Ribbon


Directions:

I began by painting all the hearts pink. I only needed one nice coat of interior flat paint.  After it dried, I drilled 2 small holes near the top but carefully and slowly so I didn't split the wood because its thin.  Then I took some pretty cream colored ribbon and tied it through the holes  Next I lay out the Victorian scrap designs I liked and began gluing with the plain modge podge using a sponge brush. You will need to be generous with the glue and press the cardstock down to make sure all the edges are in place.  I saw a few kids put the glue on the wood instead of the paper today, but to really get the paper to stay down, I recommend putting the glue directly to the back of the cardstock. Lastly, I took a clean spongebrush and generously applied the glitter modge podge top to bottom, left to right all over the entire design.  Let it dry and hang it up and Enjoy! They look much more sparkley in person with the glitter modge podge. I had a little trouble capturing the true sheen with my camera, but hopefully you can get a glimpse into how pretty they are.  These were very affordable to make and no two are exactly the same.  Oh and don't be afraid to layer the images and angle them in different directions! Let me know if you make any as I'd love to share your pictures too!