

Wednesday, July 14, 2010


Monday, July 12, 2010

Sunday, July 11, 2010
12 Days of Giveaways and Christmas in July

12 Days of Giveaways and Christmas in July starts on Tuesday, July 13, that's just two days away! We'll be starting this shopping extravaganza off with our 1st daily giveaway from one of our shops! Make sure to stop by and enter for a chance to win one of our giveaways, there will be 12 of them, some will have more than one giveaway from the featured boutique or boutiques for each day! We will be posting a list along with pictures of each item and the featured boutique or boutiques and Giveaway of the day, on Tuesday July 13! There is no purchase necessary to participate and the giveaways are fabulous! The daily winner will be announced here on the blog, just look at the category "lucky winners" to see if you were chosen. We will also announce it on facebook, twitter and at Shabby Cottage Shops everyday, so be sure to check back and see if you are one of the lucky winners!
Monday, March 29, 2010

Friday, February 12, 2010
Pink Valentines With Victorian Ephemera Scrap

I made a few of these as gifts for friends, and then brought in the supplies today to help 32 6th graders make their Valentines. I have 2 pictures below. These are so pretty and easy to make.
You need:
An 8" wooden heart, available at Michael's and Woodworks Ltd. www.craftparts.com They are less expensive at $.99 each at Woodworks, compared to Michael's at $1.29 each. Not a big deal but I bought enough for the class so the savings was nice with Woodworks Ltd.
Plain Modge Podge
Glitter Modge Podge
Sponge brushes
Victorian Scrap printed on card stock and cut out
Paint
Drill
Ribbon


Directions:
I began by painting all the hearts pink. I only needed one nice coat of interior flat paint. After it dried, I drilled 2 small holes near the top but carefully and slowly so I didn't split the wood because its thin. Then I took some pretty cream colored ribbon and tied it through the holes Next I lay out the Victorian scrap designs I liked and began gluing with the plain modge podge using a sponge brush. You will need to be generous with the glue and press the cardstock down to make sure all the edges are in place. I saw a few kids put the glue on the wood instead of the paper today, but to really get the paper to stay down, I recommend putting the glue directly to the back of the cardstock. Lastly, I took a clean spongebrush and generously applied the glitter modge podge top to bottom, left to right all over the entire design. Let it dry and hang it up and Enjoy! They look much more sparkley in person with the glitter modge podge. I had a little trouble capturing the true sheen with my camera, but hopefully you can get a glimpse into how pretty they are. These were very affordable to make and no two are exactly the same. Oh and don't be afraid to layer the images and angle them in different directions! Let me know if you make any as I'd love to share your pictures too!
Wednesday, December 23, 2009
A Story By My Son Harrison, Age 8

Friday, December 11, 2009
Shabby Chic On A Budget
Admittedly, when my friend Abby called and said her neighbor had a wooden headboard for sale, and the price was $3.00, I knew Abby had struck gold for me! She didn't even wait for me to say if I wanted it, she bought it up and shoved it in her car, 2 kids and all, and delivered it to me. Abby rocks! The headboard is a double size and has carved roses and large knobs at the top. It was exactly like the headboard used in a bench I just sold. It has lots of dings and scratches, my personal favorite type of wood because I feel it has so much charm. It was unfinished wood and had so much potential!
My daughter is 12 years old, and we agreed that for Christmas I would fix up the headboard and buy her a double bed since she outgrew her twin daybed. On a little side note, the sweetest couple came and purchased her daybed last night. They too have 3 sons and a daughter. She told me their ages: 20, 18, 18 and 12. I asked if they have twins like me, and she said "no we are a blended family." I really enjoyed hearing that because I have been a single mom for 8 years now, and I really hope to be a blended family some day. I know in God's time, the right man will come to me. Okay, so back to the headboard :)
The headboard was painted Linen White in exterior flat and it looks amazing! I normally hand paint most pieces, but this was done with a spray gun and is not distressed on the edges. It looks really sweet and perfect for my daughter. I can always distress it later but like the way it is for now.
Her new mattress, boxspring and frame will be delivered tomorrow so I have been getting her room cleaned up today. I used a Rachel Ashwell Simply Shabby Chic pink "silk" curtain panel that is lined and heavy for her window. They come 84" long and I had already used the other half in my kitchen window so all I had to do was add a 1" seam for the curtain rod. The panel is $24.95 at Target (www.target.com)
I used one of my $35 chandeliers in pink and white and hung that from the ceiling and covered the cord in my pink organza cord cover, which I have in my store for $8.00. Then I went with my son to IKEA (www.ikea.com) and planned on buying a white ceiling canopy ($19.95). However, when we got there, I saw that they also come in green, blue and are you ready for this...PINK!!! The pink was only $17.00 so I bought that and came home to assemble it. All you have to do is tie the ties onto the metal frame and it hangs from a center loop. I had some different shades of faux pink roses I had used for display at the Rose Bowl and easily took them apart and glue gunned the roses onto the top of the frame where the ties meet the metal on the outside of the frame. I will add pictures with the bed, but wanted to share tonight because my daughter is on cloud 9, and therefore, so am I!
Oh, and all her bedding is also from Target in the Rachel Ashwell Simply Shabby Chic collection and are extremely well priced. I can see that these pictures aren't great. I will update better ones tomorrow for the final reveal.


My daughter is 12 years old, and we agreed that for Christmas I would fix up the headboard and buy her a double bed since she outgrew her twin daybed. On a little side note, the sweetest couple came and purchased her daybed last night. They too have 3 sons and a daughter. She told me their ages: 20, 18, 18 and 12. I asked if they have twins like me, and she said "no we are a blended family." I really enjoyed hearing that because I have been a single mom for 8 years now, and I really hope to be a blended family some day. I know in God's time, the right man will come to me. Okay, so back to the headboard :)
The headboard was painted Linen White in exterior flat and it looks amazing! I normally hand paint most pieces, but this was done with a spray gun and is not distressed on the edges. It looks really sweet and perfect for my daughter. I can always distress it later but like the way it is for now.
Her new mattress, boxspring and frame will be delivered tomorrow so I have been getting her room cleaned up today. I used a Rachel Ashwell Simply Shabby Chic pink "silk" curtain panel that is lined and heavy for her window. They come 84" long and I had already used the other half in my kitchen window so all I had to do was add a 1" seam for the curtain rod. The panel is $24.95 at Target (www.target.com)
I used one of my $35 chandeliers in pink and white and hung that from the ceiling and covered the cord in my pink organza cord cover, which I have in my store for $8.00. Then I went with my son to IKEA (www.ikea.com) and planned on buying a white ceiling canopy ($19.95). However, when we got there, I saw that they also come in green, blue and are you ready for this...PINK!!! The pink was only $17.00 so I bought that and came home to assemble it. All you have to do is tie the ties onto the metal frame and it hangs from a center loop. I had some different shades of faux pink roses I had used for display at the Rose Bowl and easily took them apart and glue gunned the roses onto the top of the frame where the ties meet the metal on the outside of the frame. I will add pictures with the bed, but wanted to share tonight because my daughter is on cloud 9, and therefore, so am I!
Oh, and all her bedding is also from Target in the Rachel Ashwell Simply Shabby Chic collection and are extremely well priced. I can see that these pictures aren't great. I will update better ones tomorrow for the final reveal.


Sunday, December 6, 2009
Pink Starfish


Last night, I worked on these pink starfish over a bottle of wine, with Abby, a friend I've known since I was 5. Today I am 38. I love that Abby worked on her Christmas cards while I painted, glued, & glittered my starfish. Our children played while we laughed and got lost in our projects. It was a lovely way to spend our Saturday night.


Saturday, December 5, 2009
Of The Sea


I made three, and then felt the pull to my pink paint. I am waiting for the paint to dry on 9 pink starfish. Anyway, I hope you enjoy the blue. If you have a chance, please take a peek at Bella Lucille later because I will be adding the pink ones when they are finished.
~Jennifer
Wednesday, November 25, 2009
Pink Ice Skates
Like so many people, I opened last December's Romantic Homes with great enthusiasm. I love to see all of the beautiful holiday pages. When I came to Cathy Scalise's hand painted pink ice skates, they took my breath away. What a clever and creative idea! I absolutely loved them. I never thought to work on a pair myself. It seemed somehow out of my league.
A year passed, and I opened the December 2009 Romantic Homes and saw pink skates, this time made by a reader named Rosanne, who had received her inspiration from Cathy Scalise.
Feeling more confident in my craft, I bought a pair of white ice skates and went to work. I hand painted mine pink, and painted the black heels white. I also painted the blades white and added a thick dusting of ulta fine white glitter. I included some pink rick rack where the heel meets the leather. At the top I added some white marabou trim. Lastly, I added 13 pink ribbon roses for trim near the laces.

I like the way mine came out, although I admit I still think Cathy's are the prettiest I have seen. If not for Cathy's skates, I never would have thought of making a pair, so I am grateful to her for the inspiration.

To read more about Cathy and to see her amazing creations, please go to http://www.eleganceandwhimsy.com
A year passed, and I opened the December 2009 Romantic Homes and saw pink skates, this time made by a reader named Rosanne, who had received her inspiration from Cathy Scalise.
Feeling more confident in my craft, I bought a pair of white ice skates and went to work. I hand painted mine pink, and painted the black heels white. I also painted the blades white and added a thick dusting of ulta fine white glitter. I included some pink rick rack where the heel meets the leather. At the top I added some white marabou trim. Lastly, I added 13 pink ribbon roses for trim near the laces.

I like the way mine came out, although I admit I still think Cathy's are the prettiest I have seen. If not for Cathy's skates, I never would have thought of making a pair, so I am grateful to her for the inspiration.

To read more about Cathy and to see her amazing creations, please go to http://www.eleganceandwhimsy.com
Tuesday, November 17, 2009


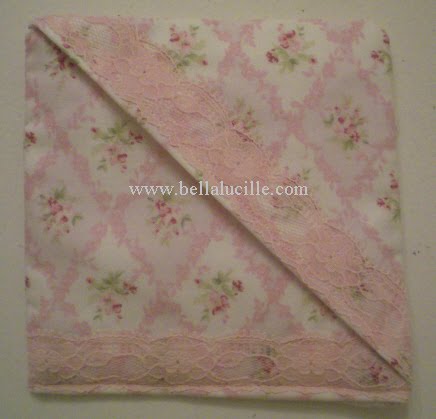
I have added the most adorable tooth fairy pillows, made out of the prettiest vintage reproduction fabrics and trimmed with pink lace. At $12.95, these are affordable and make lovely gifts. And by popular demand, coming in the next few weeks I will be adding tooth fairy pillows in boy colors so please look for them.
Tuesday, September 15, 2009
Vintage Treasures

Hand painted vintage table lamp. This belonged to my grandmother and my mom is 65 and grandma had the lamp before she was born so we know it is old, but not exactly sure how old. The body is ceramic and the roses and flower colors on it are vibrant and there do not appear to be any flaws. I have listed it on ebay (with mom's blessing) and hope to find out more about it from someone with more knowledge on antique lamps.
http://cgi.ebay.com/ws/eBayISAPI.dll?ViewItem&item=160362767118&ru=http%3A%2F%2Fshop.ebay.com%3A80%2F%3F_from%3DR40%26_trksid%3Dp4712.m38.l1313%26_nkw%3D160362767118%26_sacat%3DSee-All-Categories%26_fvi%3D1&_rdc=1


Subscribe to:
Posts (Atom)